To setup a local VoIP network, please refer to our another stey by step document. In such document, we describe some basic concepts about VoIP and how to build a local VoIP system.
In this document, we will describe how to build a virtual VoIP system with miniSIPServer cloud step by step. We assume you know the basic concepts about VoIP.
Sometimes we also name it as hosted-VoIP or virtual VoIP. In cloud VoIP system, "PBX" or "call server" is running on a cloud computer system. You don't need to purchase a hardware, such as PBX/PC/Server, to run and maintain it. You can setup a virtual PBX in the cloud. It is very flexible.
"miniSIPServer cloud" is a kind of cloud VoIP system. You can treat it as some miniSIPServers running on a cloud system. Each customer uses his/her own virtual miniSIPServer. All operations are almost same as local miniSIPServer.
Following figure describes a simple network for small business or home based business.
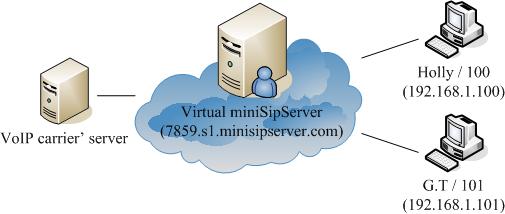
In the demo scenario, the small company has two members: Holly and G.T.
Holly's extension number is 100, and G.T's extension phone number is 101. The IP address of Holly's VoIP phone is 192.168.1.100. The IP address of G.T's PC is 192.168.1.101. miniSIPServer is in the cloud.
The company establishs connection with PSTN through a VOIP carrier's network.
We will follow subsequent steps to establish our VOIP network.
Step 1: setup cloud-miniSIPServer.
Step 2: connect local users to cloud-miniSIPServer.
Step 3: Connect cloud-miniSIPServer to VoIP providers' network.
Step 4: other services.
Configure some wonderful advance services for our small company, such as auto-attendant, ring group and pick-up.
4.1 Step1: setup cloud-miniSIPServer
This step could be the easiest one in our configuration.We just need sign up or sign in an account in website.
Once you sign in your account, please click button "System" to get basic information of the virtual miniSIPServer:
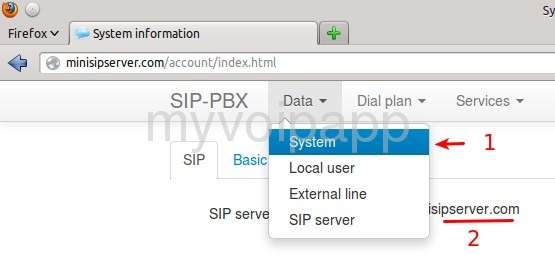
In our demo scenario, our virtual miniSIPServer address is "15000.s2.minisipserver.com". Each virtual server will have a different virtual miniSIPServer address and have an independent UDP port which is 15000 in the demo virtual server.
4.2 Step2: connect local users to cloud-miniSIPServer
First, we add two extensions in the virtual miniSIPServer.
4.2.1 Add new local users
Please click menu "Data / Local user" and click button "Add a local user" to add a new local user:
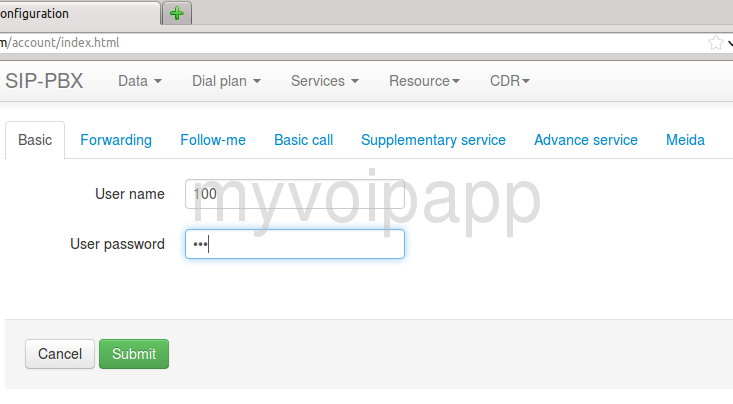
By default, we can just configure user name and password to a new local user.
4.2.2 Connect local users
We begin to configure Holly's softphone to connect miniSIPServer.
Holly uses miniSIPPhone which can be download from MYVOIPAPP. After install miniSIPPhone, please click menu "File / SIP account", then configure the SIP account:
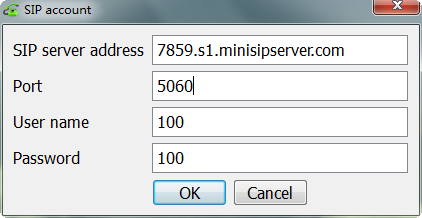
The key items are described below:
| SIP server address | 15000.s2.minisipserver.com:15000 |
| Transport | UDP |
| User name | 100 |
| Password | 100 |
Please click 'OK' button to complete miniSIPPhone configuration. miniSIPPhone will try to register to miniSIPServer. If it successes, it will display number information and be able to make call out.
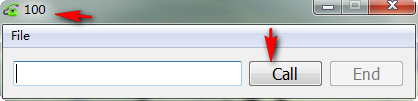
Now, Holly's phone is connected to miniSIPServer. We can follow the same steps to configure G.T' phone. If you have other kinds of SIP clients/phones, they should also be configured in the same way.
Both Holly and G.T' phones are connected to miniSIPServer. We can click menu 'Data / Local user' again to check their status. Their icons should be blue.
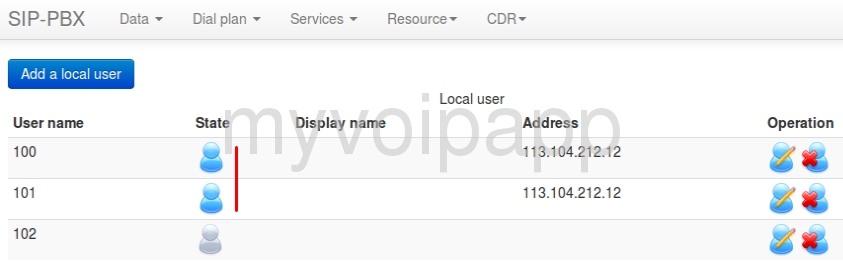
After we finish this step, the basic VOIP network is established. Holly and G.T can call each other now.
4.3 Step 3: connect miniSIPServer to VoIP provider
After establish internal VOIP network, it is time to establish connection with outside customers.
If we want to make calls to outside or receive a call from outside, we need a VoIP gateway to connect our miniSIPServer and traditional telephone, or we need VoIP provider to do it for us. We decide to connect our virtual miniSIPServer to VOIP providers' network and we select CallCentric as our VOIP provider.
After we request a SIP account and number from CallCentric, for example, the number is '17770001234', we will use use this account to configure miniSIPServer to connect CallCentric.
In the virtual miniSIPServer, please click menu 'Data / External line', then click button 'Add an external line' to add an external line with CallCentric number information.

The key informations are described as below table. Of course, you can update it according to your own configuration.
| External line type | Registers to peer SIP/VOIP server |
| External line | 17770001234 |
| Password | 1234 |
| Server address | callcentric.com |
| Server port | 5060 |
If the external line connects to the peer server (VOIP provider's network or VOIP gateway) rightly, the icon of the external line should be gray and without cross flag.
Then, we describe some details about making outgoing calls and receiving incoming calls.
4.3.1 Make outgoing call
As we have confirmed in above sections, Holly and G.T can call each other by dialing their extensions number directly. If we want to make outgoing call to our customers, how can we do it?
Since the external line is connected to VOIP provider's network ( or VOIP gateway), it is no problem to call outside customers, but we have to mention that we need add prefix '9' before we dial our customers numbers. In miniSIPServer, prefix '9' is the default outgoing prefix which is used to distinguish call type. For example, if the customer's number is '1234567', we need to dial '91234567'.
4.3.2 Receive incoming call
When we configured external line before, we has indicated 'auto attendant' at the same time by default. So when outside customers call in, miniSIPServer will prompt them to enter extension number. For example, once customers call "17770001234" ( the external line number provided by VOIP provider and configured in miniSIPServer ), they will hear "Welcome, please enter extension number" and they can enter '100' to call Holly or enter '101' to call G.T.
Because miniSIPServer uses "RFC2833" DTMF mode or SIP-INFO to collect customer's input digits, we must confirm with the VOIP provider that they can support these DTMF mode.
5.1 Why one-way audio problem?
Please refer to here for help.